BOOM
Four-star offensive tackle Caden Moss, the No. 72 overall recruit in the 2027 class, commits to Ohio State.
Four-star offensive tackle Caden Moss, the No. 72 overall recruit in the 2027 class, commits to Ohio State.

Offtopicland. Remember: no politics, religion, or hot-button social issues.

Well, the regular basketball season has come to a close, though, without the result we may have wanted. Another thing that comes to a close this week is out discussion of the War of the Second Coalition, with a discussion of the confusing winter battle of Hoenlinden.
As a reminder, if you're new to the series, or want to read more military history, please visit the archive by clicking here.
The German Campaign of 1800
1800 saw some rather significant changes in the Upper Rhine region. After the withdrawal of the Russians from the war, the Austrians recalled Fieldmarshall von Kray from Italy, and gave him command of the Austrian army in Bavaria. Meanwhile, Massena, who had taken command of French troops around the Rhine, had been driving towards Genoa by Kray and other Austria commanders. Napoleon, after taking control of France, began reshuffling troops around to reinforce the Rhine. He gave command of this army to his co-conspirator, Jean Victor Moreau, who had been driven from command by political intrigues. Kray moved north to take command from Archduke Charles, who had suffered from ill health late in 1799.
Moreau came out of the gates with a vengeance, while Kray was not particularly up to the vigorous and energetic campaign that Moreau launched. Kray fell for an early feint launched by Moreau, forcing his retreat eastward in April. Moreau continued to march quickly, forcing Kray’s flanks and driving him out of several defenseable positions before finally catching Kray at the Second Battle of Stokach. He gave Kray a bloody nose there on May 3rd, and forced Kray to continue his retreat. Additional fighting over the next week pushed Kray back onto the fortress at Ulm, which controlled access to the Danube and most of Bavaria.
Moreau gathered his forces for a few weeks, and began his attack against Kray again on June 18-19. He cross the Danube below Ulm, threatening to cut Kray off. Kray responded by trying to launch an attack against Moreau, but was soundly defeated. Only some skillful marching kept Kray from being bottled up, and allowed his escape to the east. On the heels of the defeat at Marengo, the Austrians and the French agreed to an armistice in preparation for further negotiations. However, the Austrians also hoped to reverse their fortunes later in the year by prolonging the negotiations.
The first step in regaining their lost territory was to find a general. However, there were few men of the appropriate rank to take command. With the situation desperate, no one was willing to really step into the breech other than Archduke Charles, who was too sick still to leave his home, much less undertake an autumn campaign. Emperor Francis eventually had to settle for Archduke John, his 18 year old brother. To assist him, he named Franz von Lauer as the second in command of the army, and told his brother to shut up and do what Lauer told him. He also named Franz von Weyrother as the chief of staff. Neither he nor Lauer got along, catching John in the middle, and making for a confused command structure in the Austrian army.
The Austrians maintained the armistice until November, when they dropped it to go on the offensive against Moreau. Weyrother organized an ambitious plan to marched past Moreau, force him into place at Landshut, then destroy his army in the cold winter. However, weather impeded the progress of the Austrians, and so, Lauer prevailed and adjusted the course of the campaign to try and trap Moreau in Munich or force him to fight nearby. On December 1st, the Austrian advance guard met and routed part of the French army. Convinced the French were in retreat, Weryrother convinced Archduke John to override Lauer, and launch a massive offensive.
The Battle of Hohenlinden
It took a day for the Austrians to get organized, and, on December 3rd, they began their attack. This gave Moreau time to get organized. Knowing the Austrians would come from the west, Moreau deployed his army in a large field facing a dense wood. The Austrians would need to march through this dense wood in heavy snow, forcing them to stick to paths and roads, and to march in non-mutually supporting columns. He then dispatched a force under Antoine Richepanse to the south, with orders to maneuver to the Austrian flank and rear.
The Austrians divided their forces into four columns to march through the woods, believing that they were launching a pursuit. However, the varying quality of roads, the cold weather and deep snow meant that the Austrians columns would not be able to keep pace with each other. The columns on the center left and far right advanced the fastest, meeting the French at 0700 and pushing them back out of the fortress. However, as Austrian forces emerged from the treeline, they ran into Moreau’s fully formed army. Moreau launched a series of counterattacks, pushing the Austrians back. However, as more Austrians arrived at the points of attack, the battle began to settle into a stalemate. The Austrian center-right column, lagging behind, broke up into smaller forces to get to the front sooner.
It was at this point that RIchepanse began his attack against the Austrian southern flank. He marched in front of the Austrian far left column, not even knowing it was there, and attacked into the flank of the Austrian left-center. Hearing the fighting, the Austrian left attacked Richenpanse, only to be driven back. Sensing the battle beginning to shift, Moreau committed his reserves, and began an all out assault as Richenpanse fell on the Austrian rear. By 1200, the battle was effectively over. The Austrian began a slow retreat that quickly turned into a route. Moreau’s pursuit was effective and well organized. While only 1,000 Austrians, out of 60,000, died, but another 9,000 surrendered at the end of the day. Moreau’s pursuit captured several thousand more as the Austrians attempted to extricate themselves.
After the disaster and Hohenlinden, Archduke Charles, despite his health, rushed to take command of the army. However, with Napoleon crossing the Alps again, and Moreau a day’s march from Vienna, all he could do is ask for an armistice so that the Austrians could sue for peace.

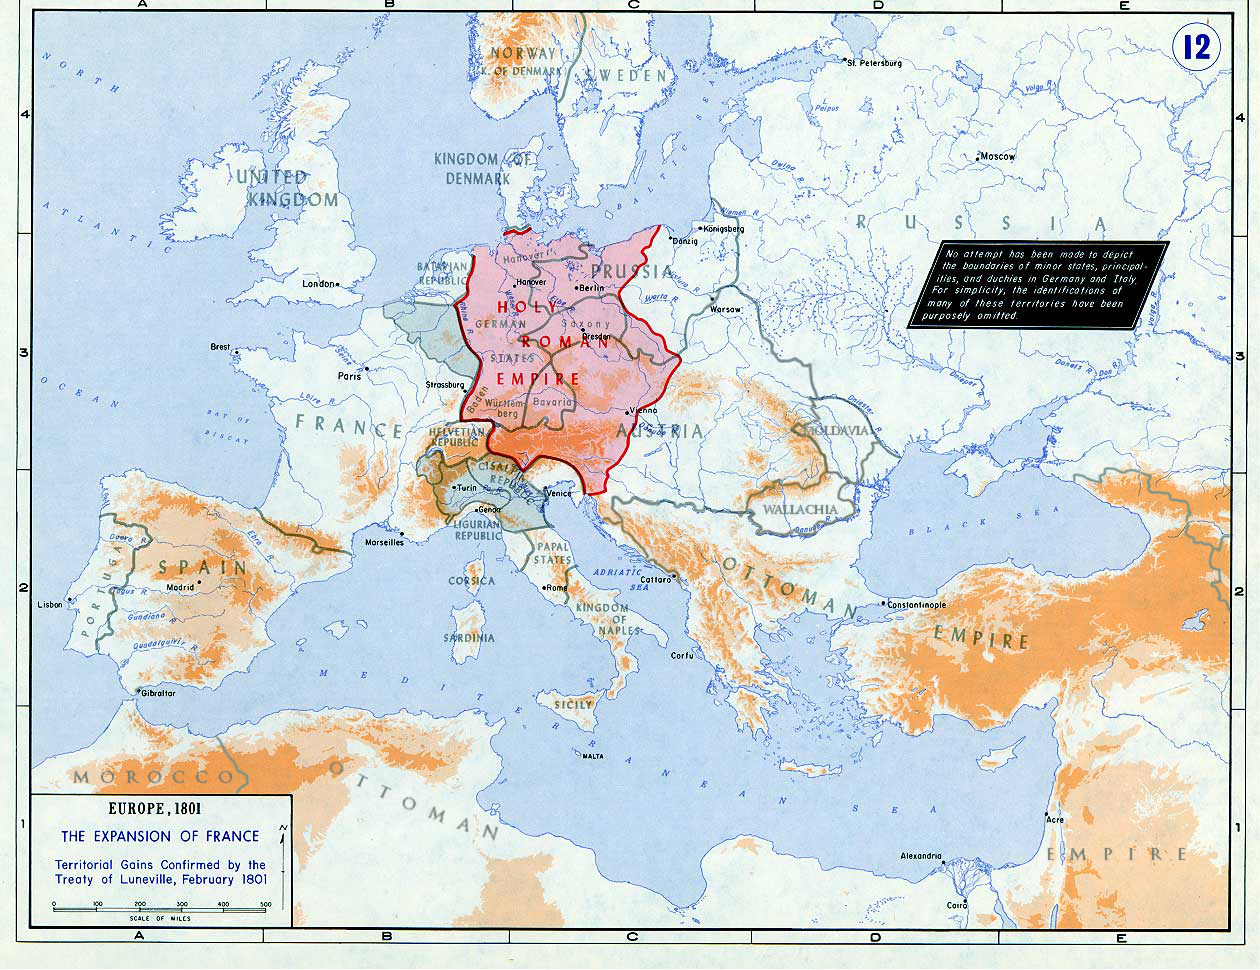
The Treaty of Luneville
Despite their great victories, neither Moreau nor Napoleon pressed the Austrians too hard at the peace table. In many ways, Luneville was a confirmation of Campo Formio. The Austrians agreed to recognize the French satellite republics in Italy and the Netherlands. They also recognized French claims to the left bank of the Rhine, and loosened their grip on the German states on the other side of the Rhine. The Austrians also confirmed the French annexations of Nice, Provence and Belgium. The Austrians did have to surrender the Grand Duchy of Tuscany, but their ally, the Grand Duke, got lands in Germany instead. The Austrians did, however, get to keep control of Venice.
This, once again, left England alone against the French, with most of Europe growing increasingly hostile to British interests.