

Well, now college football is over- and even the professional game is winding down. I suppose there are other sports, but those are mere distractions. So, let’s engage in another one- history. This week, we’re heading back to the sea for two battles that helped establish British control of the seas, even as the French were advancing on land. Because of the nature of naval battles, we can cover a couple in this post- either it’ll take a book, or a short description of the fighting.
As the First Coalition fell apart in 1796, the French began looking for ways to attack the British Isles directly. The French Navy still existed, though the French had lost several ships to the British over the course of the war, in both the Glorious First of June and other battles, as well as to the weather. Their fleets required reinforcement if they were going to pull off anything other than harassment efforts, such as their support of the United Irishman revolts. To this end, they called upon their allies, the Kingdom of Spain and the Batavian Republic, to bring their fleets and men to France to prepare for an invasion of the British Isles once the French had forced Austria to terms.
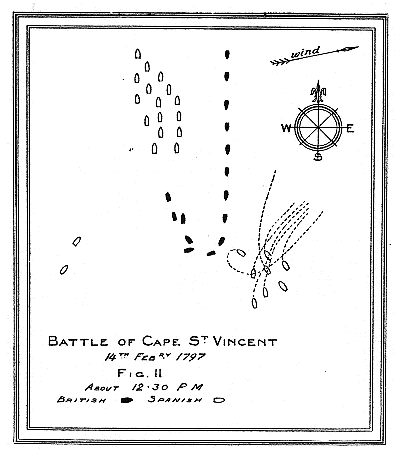
The Battle of Cape St. Vincent:
In 1795, as we discussed earlier, Spain signed a separate peace with France, effectively exiting the war and becoming neutral. Their neighbors, the Portuguese, with the support of the British, stayed in the war against the French. As the strategic situation began to change in 1796, the Spanish and French began negotiating a new treaty: the 2nd Treaty of San Indelfanso. This treaty reopened the usually friendly relations between France and Spain. Throughout most of the 1700s, the French and Spanish had teamed up against the British, both because their monarchs were cousins, and because the British threatened their overseas empires with the size and power of the Royal Navy. In fact, the British generally used continental wars in the 1700s as excuses to grab colonies in the New World and India, rather than fight on the continent.
Spain’s entry into the war on the side of France shifted the balance of power, particularly at sea, and especially in the Mediterranean. The Royal Navy, despite its size, had a lot of ground to cover- to maintain the blockade of France took dozens of ships, stretched from Amsterdam to Bordeaux, as well as a force in the Mediterranean. When the Spanish entered the war, the British Mediterranean Squadron, with 15 ships of the line, found itself heavily outnumbered and on the defensive. Throughout 1796, they also lost many of their bases in Italy to Napoleon’s Italian campaign. By the end of 1796, John Jervis, the commander of the British Mediterranean Squadron, had to abandon the Mediterranean itself and fall back to Portugal.
Over the winter of 1796-97, the French and Spanish agreed to transfer the Spanish Mediterranean Fleet to Brest, on the English Channel. With no blockading British force, the Spanish figured the only real challenge to the voyage would be to slip the British guns at Gibraltar, which wasn’t that difficult to do in the end. On February 1st, the Spanish fleet of 27 of the line, with 50 merchant ships headed for Brest, sailed from Cartagena and slipped past Gibraltar into the Atlantic, bound first for Cadiz, then Brest. However, a Levanter came up, and drove the Spanish deeper into the Atlantic, and this gave Jervis some time to react.
Jervis put to sea, and deployed his scouting frigates under his best subordinate, Horatio Nelson, to look for the Spanish. On the 11th, Nelson found the Spanish fleet in a dense fog, and famously sailed through the Spanish line to make his way to inform Jervis of the position of the Spanish. Nelson could not ascertain the size of the Spanish fleet, but Jervis sailed to intercept the Spanish anyway, not knowing he would take his 15 ships of the line against 27 Spanish ships.
During the night of 13-14 February, Jervis closed on the Spanish fleet, and, by first light on the 14th, had the Spanish in sight. The Spanish ships were divided into two groups- the first group, northwest and to windward of the second, consisted of the Spanish ships of the line, while the second group consisted of the merchant convoy and its escort. The Spanish, unware of the existence of the British fleet, had not put out any scouts, and the sudden arrival of the British caught the Spanish unawares. The Spanish fleet was also in a low state of training and capability- during the night, and, in fact, all through the voyage, the Spanish had failed to keep any sort of formation, so that, when the British arrived, they weren’t in a line as much as a gaggle, and had no way to really form up.
As the British closed, Jervis orded his ships into two columns. His plan was to sail into the gap between the two Spanish groups, firing to both sides as he passed, then to turn into the Spanish ships of the line and enter a general melee.

The weather and Spanish action prevented this. The Spanish turned to form up into something like a fighting formation, their broadsides to the British as the British passed them at long range, and some long range fire passed between the squadrons. The British ended up shaking out into a single line, concentrating their fire on the Spanish battleships as they passed. As the British passed, they began to tack into the wind to set up a pursuit of the Spanish force, turning in succession- a slow maneuver that preserved their formation, but let the Spanish get further away as they did. It also gave the second Spanish squadron a chance to break into the British formation at the point where the turn in succession was taking place, and several Spanish ships rushed to take advantage of the situation. The British ships in the lead maneuvered to lay fire on this Spanish force, and drove it off- at the cost of further disruption and slowing the pursuit of the Spanish ships.
During the course of the battle thus far, Jervis had made two signals- one a group of signals indicating the formation and the start of the battle, and another around 1305, ordering the fleet to “Take positions of mutual support and engage the enemy coming up in succession.” In the rear of the fleet, Nelson, who had returned to his normal command in the line of battle, decided to interpret this signal rather liberally. He broke out of line and sailed directly for the heart of the Spanish formation, followed by two more ships at the rear of the line. Nelson came under heavy fire as a result of that maneuver, but kept sailing for close range, with the support of other ships.

Seeing Nelson and his ships dashing into the heart of the Spanish formation, Jervis signaled for the ships at the center of his formation to come around and support them, rather than maintain a line of battle that would keep them out of the fight for too long. This brought most of the British fleet into action, with the lead ships of each of the three ad-hoc lines closing in for a melee with the Spanish ships. Given the Spanish “formation”- more of a gaggle than anything- the British were able to concentrate their fire on the exterior of the formation, while the Spanish fired as much into their own ships as the British. That is, when they did manage to fire- the poorly drilled crews had a hard time keeping up any serious fire, while the well trained British crews could pour rapid fire into the Spanish at close range.

At about 1500, a series of boarding actions began as the British closed. Nelson, rather famously, led a boarding action first into one Spanish ship, then across the decks of that ship directly into another one. Other ships closed to damage or board the enemy, and the Spanish fleet began to break up. The merchants ran for Cadiz, shortly joined by those Spanish ships of the line that could get away. In the end, the British captured 4 prizes, heavily damaged several more ships of the line, and drove the Spanish into Cadiz, preventing French fleet at Brest from receiving reinforcement.
Mutiny!
Despite the succeses of the British at sea, they faced severe morale problems aboard their ships. This came about because of a confluence of problems. The most significant was the rapid expansion of the Royal Navy- from 134 ships in 1793 to 650 in 1797. This required the impressment of thousands of sailors, as well as the conscription and recruitment of landsmen. This caused conflict in the ships, as landsmen didn’t take well to discipline, professional sailors resented having to take up the landlubber’s slack, and the recruitment of criminals caused problems below decks as well. There was an expansion of officer’s ranks as well, and men who previously either wouldn’t have made it into the service, or would have been put on half pay for their incompetence, were needed to fill out the leadership positions on the ships. The copper-plated hulls of British ships allowed ships to stay out at sea for more than a year without returning to port, depriving sailors of any of the entertainment of shore or the ability to see their families. Despite a period of sharp inflation at the end of the 1700s, pay for sailors hadn’t changed since 1653, and number of stoppages and perquisites- such as the right of the purser to two ounces of every pound of meat served to sailors- diminished that pay even further.
As the war seemed to be winding down, a number of sailors resented their situation and decided to do something about it. In April of 1797, the sailors of the Channel Fleet in Spithead refused any duty other than regular port routine, and organized a delegation of men to set out their demands: more pay, better food, an elimination of pay stoppages and witholdings, and the dismissal of a few officers. The mutineers at Spithead kept up routine and discipline, and eventually received their demands after a few week’s negotiation, which were mostly held up over the pardon the mutineers wanted. Eventually, Admiral Howe, a greatly respected Admiral and diplomat, came out of retirement and negotiated a settlement- more pay, better food, the removal of the worst officers, and a pardon for the mutineers. The munity ended immediately after that, and the Spithead squadrons entered service.
Just as the Spithead situation wrapped up, a more serious mutiny started in the Nore, outside London. In this case, several crews seized control of their ships, and began to try and force other ships to join their mutiny by threat of force. The demands of the mutineers started out the same as those at Spithead, but quickly grew more intense- the elimination of flogging and impressment, even more pay, and, eventually, the dissolution of Parliament and immediate peace with France. As the demands grew, the number of ships involved in the mutiny dwindled further, as the regular sailors refused to go along with the demands and helped their officers retake their ships. Eventually, the ringleaders tried to escape to France, but were captured and hanged. Other occasional mutinies followed throughout 1797, mostly against cruel officers. However, these petered out over time, and order was restored.
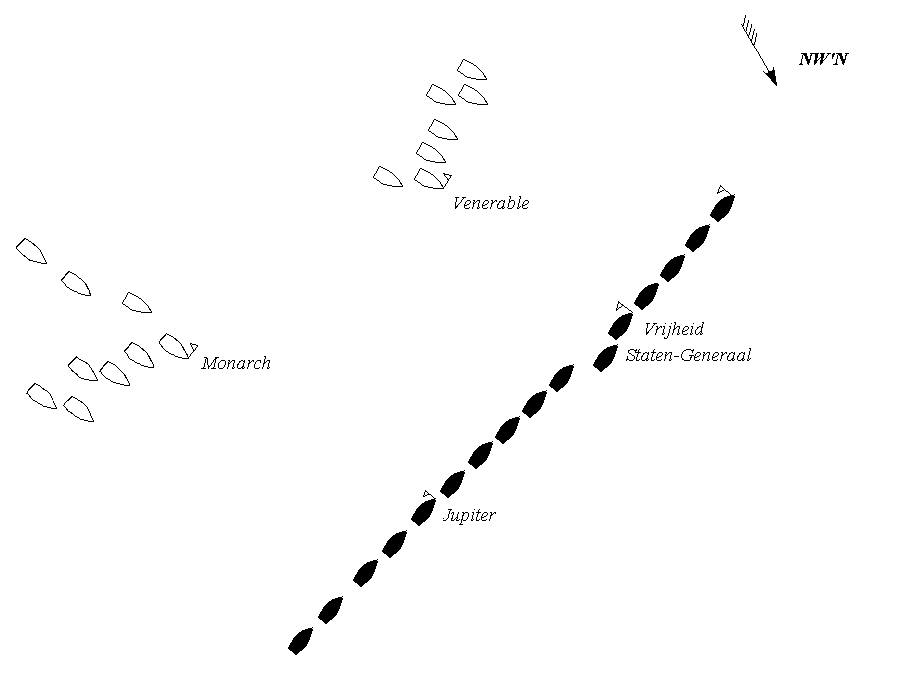
The Battle of Camperdown
Throughout the summer of 1797, the Dutch Fleet, under the command of Jan de Winter, had tried to break out to join the French at Brest. However, winds and the British North Sea Squadron, under Adam Duncan, had prevented this effort. However, on 1st October, Duncan returned to port for refitting, giving de Winter a chance to break out. It took a week for de Winter to make his breakout, though, allowing Duncan time to organize his scouts to observe the breakout, and complete his own refitting. By the 11th of October, Duncan’s fleet, with 14 of the line, had chased down de Winter’s force of 11 of the line outside the village of Camperduun, attracting an audience of interested Dutch civilians on the nearby beach.
The Dutch formed up in a strong, well organized line-ahead formation, downwind of the British and to the windward side of the shore. De Winter also formed a second line from his smaller ships- frigates, brigs and sloops- in the gaps of his line of battle, which would allow these smaller ships to fire on any British ships that attempted to shoot through the gaps between the Dutch ships of the line. This formation, while defensive, offered a lot of firepower against any attack the British would care to make.
Against this formation, Duncan planned to follow the same general plan as the Glorious First of June, where each ship would shoot through a gap in the Dutch line, and reform the line between the Dutch ships and the shoreline. However, the weather on the 11th was rather poor, with winds variable and seas rough. Also, there wasn’t enough room on the other side of the Dutch line to reform the line without risking running aground. Duncan opted for Plan B- everyone turn into the Dutch line. Half his fleet would cut out the Dutch rear, the other half would go for the Dutch van.
Duncan’s attack was assisted by the weather- the strong winds and heavy seas made it hard for the less well drilled Dutch sailors to keep the tight formation that de Winter wanted to maintain. In particular, the rear of the Dutch fleet struggled to keep up with the rest of the Dutch force. De Winter tried to organize his fleet to slow down and reform as Duncan raced down on him.
At 1205, Duncan signaled for close action, and eight British ships of the line fell on the four ships at the rear of the Dutch line. In a swirling melee, the British ships quickly overwhelmed and forced the surrender of Dutch line in about an hour, capturing four ships of the line and a frigate. Meanwhile, at the vanguard, a more even fight developed. The Dutch center laid on all speed they could and rushed to support the vanguard as Duncan’s ships closed, and the fight turned into a sharp, pounding melee that left several ships heavily damaged. A number of Dutch ships began to peel out of the fight for the shore.
As the combat continued, the British rear, after defeating the Dutch rear, began to rush forward to reinforce Duncan’s main effort. This attack, led by William Bligh (Yes, that William Bligh) forced two more Dutch surrenders. Bligh came alongside de Winter’s flagship, Vrijheld, and smashed all of her masts. Bligh called on de Winter, the only officer still walking, to surrender. De Winter refused, and called his carpenter to repair his barge so that he could take command of one of the fleeing, but functional, ships, and continue the fight. Bligh boarded Vrijheld, and his men captured de Winter while he swung a hammer to get his barge into shape, effectively ending the battle.

The Battle of Camperdown was more successful, but bloodier, for the British. Seven Dutch ships of the line were captured, but at the cost of 200 British lives, compared to the four Spanish ships Jervis captured at Cape St. Vincent at the cost of 76 lives. However, both victories were vital strategic successes for the British. Preventing the union of the Dutch, French and Spanish fleets in Brest held off the threat of invasion in 1797 and 1798. This freed up British ships to reenter the Mediterranean in 1798, and, as we shall see, they will have a major impact on Napoleon’s Egyptian campaign. The willingness of the British to keep fighting, even after the Treaty of Campo Formio, would also be a major factor in encouraging the Austrians and Russians to declare war on France and form the Second Coalition in 1799.
If you like these posts, and would like to read more, please check out the archive by clicking here.