

I trust that everyone’s had a good holiday season so far- or, if not, a good bowl season. Or, even better, both!
This week, we’ll discuss the Battle of Fleurus, which will end our discussion of the Flanders Campaign of the French Revolutionary Wars- since, that’s the last battle in the campaign. The Flanders Campaign is a good nutshell of the early part of the Revolutionary Wars, and it’s also the campaign with the most real field battles- most of the action in Italy and Spain revolves around positional maneuvering. However, before we talk about the battle itself, we need to talk about the further tactical development of the French Revolutionary army.
The Demi-Brigade
By 1794, there were a lot of troops in the French Army: Soldiers from the old Royal Army that stuck around, members of the National Guard, established early in the Revolution, the eager volunteers recruited by the Committee, and the conscripts of the Levee en Masse. Each of these groups had different levels of skill in musketry and drill, some were more enthusiastic about fighting, and some were more disciplined and willing to take orders than others. The old Royal troops, for example, were well drilled professionals, but held to the methods of fighting that developed in the 1700s. The more willing volunteers loved a good fight, and could be trusted to fight unsupervised, but didn’t really have any training in drill. Most conscripts that didn’t try to desert at the first opportunity still couldn’t be trusted on the field without supervision, or to really fight without urging. To top it all off, 1794 saw 1,000,000 men inducted into the French Army, on top of the 200,000 in service at the end of 1793.
There was also the issue of the new tactics that the French wanted to employ. Rather than engaging in firefights at close range, where volleys of fire slowly broke the discipline of professional troops, as we’ve seen at Jemappes and Wattignies, the French relied on attack columns providing sheer mass to overwhelm the stretched out lines of the older, professional armies, breaking those formations. However, these tactics were working out less and less- the Allied armies were learning how to concentrate their fire, and maneuver units to outflank the columns as they closed to deliver enough fire to break the French attacks, and to position their units to limit the effectiveness of the French opening cannonades, which had done most of the work at Valmy and Jemappes.
To solve all of these issues, Carnot- the member of the Committee for Public Safety who had tried to get Jourdan executed- reorganized the army into Demi-Brigades. Demi-Brigades combined one battalion of old Regulars, and two battalions of conscripts or volunteers. Demi-Brigades were further divided into two types: line brigades and light brigades. The line brigades were filled with more reluctant troops, men their commanders believed needed to be kept in tight formations like lines or columns so that they would fight on the field. In these brigades, the old Royals would use a line formation to deliver fire into the enemy position, while the columns were driven in to finalize the attack. The light formations would deploy as skirmishers- men out in open order, engaging in fighting in small groups or even individually. Skirmishers would use terrain for protection, and would try to run if any formed formation got too close.
Skirmishers weren’t anything new to the French Revolutionary army. Most armies in the 1700s had groups of skirmishers- the American militias, the Austrian Croat battalions and Hussars, the Prussian schutzen and jaeger troops. However, these troops were mostly used off of the battlefield, in what was known in the era as the petite guerre- what today we would call guerilla warfare. Skirmishers raided and guarded supply convoys, scouted for the enemy, fought the enemy’s scouts, and other similar tasks. However, on the battlefield, their main use was either guarding the main camp, or seizing terrain such as heavy woods or marshes that cavalry formations couldn’t drive them out of. However, these units were usually a small proportion of the force used in a pitched battle- once the armies joined, the bulk of infantry fought in tight formations, and most the cavalry rode knee to knee.
The French Revolutionary armies turned this on its head. They used a large number of light troops, and deployed them to the battlefield. These skirmishers served several roles. They could deliver a steady harassing and demoralizing fire, weakening enemy formations- especially those formations protected from artillery fire. This harassing fire softened up the enemy for later attacks by line formations, and also had a demoralizing effect- skirmishers were hard to hit with musket fire, and enemy units couldn’t attempt to drive them off with an attack without threatening the overall integrity of the line- a big no-no. The skirmishers also screened the line formations from both observation and fire. The line formations could be kept back, out of musket and even artillery range while the skirmishers did their job. The smoke produced my skirmish fire made it hard to see what was going on behind the skirmish line, allowing the line formations to maneuver and close. Once the columns moved in for the attack, the skirmishers could protect their flanks. And, if it all went wrong, the skirmishers could cover the retreat, allowing French commanders to rally their men for another try at it.
This organization allowed the French to press an attack against the more adaptive Austrian and British forces in 1794 and after- the skirmishers went forward under a cannonade, where they began harassing the enemy. This harassment would go on for some time, while the line formations held back. As the enemy began to waver, the line formations would go forward. The royal units of the line formations would provide a last second volley as the columns closed in for the attack, protected by the skirmishers as they gave way. This allowed the French to maximize their numbers and match their men’s enthusiasm and training to their role in the field. At least, in theory.
The Battle of Fleurus
After Jourdan’s victory at Wattaignes, both armies turned to winter quarters. The Austrians, needing to regain ground, went on an offensive in the late spring and early summer. While the French won the first engagement, the Battle of Tourconing, Jourdan’s successors in the Flanders area proved themselves largely incompetent, and the Anglo-Austrian army, under the command of Prince Coburg, began beating the French up and down the Flanders area by adopting French column attack tactics. The Committee quickly recalled Jourdan in late May, giving him command of the Army of the Moselle and directing him to besiege and capture the main Allied fortress at Charleroi. The capture of Charleroi would cut off the Austrians from their main source of supply. To support Jourdan, the other commanders tried to delay, with some success, the Austrian army as it moved to relieve the siege.
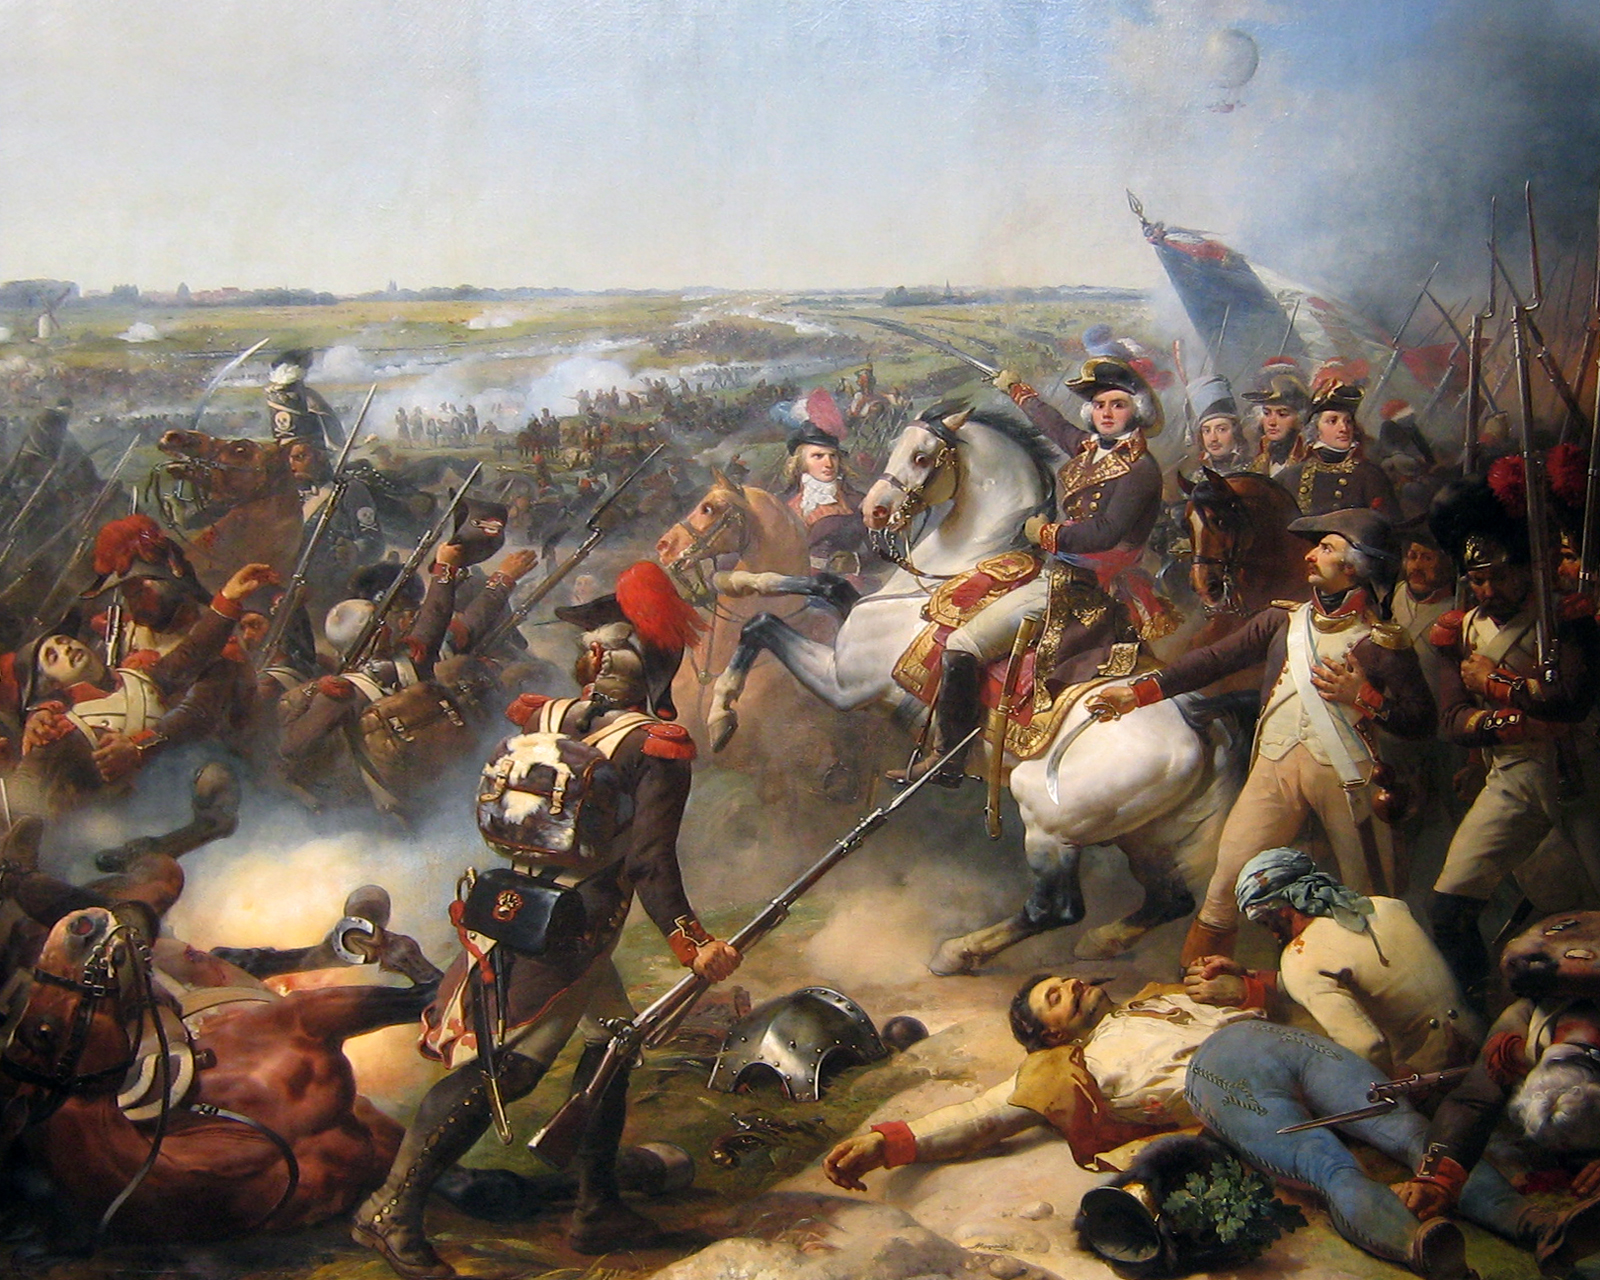
As Prince Coburg closed in on Charleroi, Jourdan assembled the disparate French armies into a single force of about 70,000 men and 100 guns. Coburg hoped to catch Jourdan between the fortress and his army, but, unfortunately, Jourdan took the town by storm before he arrived. This allowed Jourdan to deploy all 70,000 of his men against Coburg’s 52,000 men. Jourdan also held a major advantage in intelligence, both from his skirmishers and from an observation balloon that followed Austrian movements. Meanwhile, as Coburg planned his attack, he didn’t even know that Charleroi was in French hands, which forced him to both make his attacks more hastily than he wanted to, and to face more enemy soldiers than he wanted to.
Jourdan deployed his troops into a line with his left flank refused at a 90 degree angle to the rest of the line. He held a strong reserve in the center of his formation. Coburg planned an attack in five columns, using French tactics from the previous year. He planned to cannonade the French, then attack in deep columns- two columns against the French flanks, and one against the French center to pin it in place. Jourdan kept his skirmishers forward, while he held his line brigades back further, to shelter them from the Austrian cannonade, as well as harass the Austrian columns as they closed for the attack.

Coburg had his men into position before dawn, and attacked as the morning broke. Unfortunately for Coburg, his attacks did not close in a coordinated matter. On the French left, the Austrians launched their attacks early, brushing aside the French skirmish lines. Behind them, the French line formations attempted to drive off the Austrians with a combination of fire and counterattacks from the column formations held back. The fighting went back and forth as both sides attacked, rallied and attacked again. However, on the French left, Austrian attacks began to gain steam, forcing Jourdan to commit the reserves, driving the Austrians back far enough to relieve pressure on the French forces on the left. However, just as he had stabilized his left, the Austrian attacks on his right began to take hold, and local counter attacks failed to drive them off. Jourdan rallied his reserve, and launched a supporting attack to stabilize the right. This back and forth action lasted for several hours, stretching into the mid-afternoon.
As the Austrians made their attacks, Austrian scouts snuck behind French lines to link up with the troops they believed were in Charleroi. However, they found out that the fortress was, in fact, in French hands. Once word came to Coburg that the town had fallen, the French center began a rapid and successful counterattack, supported by the remains of the French reserve as the day began to draw to a close. Coburg deployed his reserve to meet the counterattack, and began ordering a general retreat from the field. Exhausted by 15 hours of fighting along a several mile long front, Jourdan decided to let Coburg go, and try and catch him another day.
The casualties were, in the end, even on both sides. The French suffered about 1500 dead and 3500 wounded, and the Austrians suffered about the same losses. The French held the field after the battle, allowing them to claim a victory, but the Austrian army remained in good shape.
The Aftermath of Fleurus
What Fleurus lacked in excitement on the field, it made up for in results off the field. The battle had a tremendous influence on the Netherlands and Dutch Republic, the First Coalition, and in France itself.
In the end, the Austrians decided to abandon their holdings in the Netherlands. The capture of Charleroi and other fortresses in the Austrian Netherlands made it impossible to hold onto the territory. However, rather than retreat to the north, towards the Dutch Republic and England, the Austrians retreated across the Rhine into the Holy Roman Empire. This opened the way for for Charles Pichegru, one of Jourdan’s subordinates, to launch a winter invasion of the Republic in the winter of 94/95. The harsh winter allowed Pichegru to cross the rivers that guarded the Republic, surprising the Dutch and English forces. The French invasion also sparked a full-on revolt against the Prince of Orange. The Prince fled as the Dutch army collapsed, joining the British army as it evacuated from the area. The French captured the Dutch navy mostly intact, and established a Revolutionary Republic, the Batavian Republic, as a puppet state. The Batavian Republic, organized on Revolutionary lines, reorganized its army and signed an alliance with the French Republic.
The Austrian retreat fractured the First Coalition against France. The strongest army in the field against the French- the Anglo-Austrian-Dutch army, split up. The Austrian abandonment of the Austrian Netherlands, and the subsequent French conquest of the Dutch Republic, led the Prussians to reconsider their hostile position towards France. Prussia had been a big winner, territorially speaking, of the Second and Third Partitions of Poland in 1793 and 1794, and wanted time and space to absorb its conquests. This, combined with the Austrian retreat across the Rhine, induced the Prussians to sign the Treaty of Basel in April of 1795. This Treaty withdrew the Prussians from the war against France, and recognized French conquests up to the west bank of the Rhine River. With the Prussians out of the war, and the French on the move in the Pyrenees, the Spanish signed a separate peace at Basel in July, 1795, and, in August 1796, allied with France and declared war on the British Empire. After Basel, only the Austrians, the British and the Portuguese remained at war with France, and the war would shift fully into the Rhine front and into Northern Italy in 1796.
The most profound influence of the battle, however, was felt in France itself. The ongoing military crisis in Flanders, along with the revolts in the Vendee and the general economic crisis, gave Robespierre a credible reason to continue the Terror, through the Revolutionary Tribunal and the Law of the Maximum. However, the victory at Fleurus, and the Austrian retreat, along with the final victory in the Vendee and against Spain, combined with the arrival of the Grain Convoy after the Glorious First of June, relieved most of the pressure in France, economically and militarily. This led many of Robespierre’s allies to call for an end to the Terror and other forms of repression, and a return to a more normal style of government. However, for Robespierre, the Terror was not a harsh measure to enforce support to stave off military disaster, it was the means to fundamentally transform French society into a nobler, more perfect society. Rather than heed the calls to end the terror, Robespierre plotted to deliver his allies into the Terror, planning their arrest and execution. Word got around quickly, and those on Robespierre’s list did unto Robespierre before Robespierre could do unto them. Robespierre called upon the mob of Paris to save him, but with military victories under their belt, their bellies full and their bloodlust stated, the mob refused to save him. He was executed in late July, 1794, and the Committee began the transition from an emergency government to a permanent one, forming the Directory in 1795.
1795 would see the Austrians, fully mobilized, stake out positions against the French in Italy and Germany, while the British tightened their blockade. But that’s for another time.
If you like this post, but feel like you’ve been dumped in the middle of something, take a look at the archive of military history posts: The Archive